Adding projects to PowerPoint
Adding a Squirrel project to a PowerPoint presentation can transform a static presentation into a visually pleasing, easily understood, and dynamic experience.
Step-by-step:
Inside Squirrel
Publish your Squirrel project to the cloud (see the Publishing to Cloud tutorial for more info).
Ensure that the status of the project is set to Live:
Click on the ellipses alongside the project to open the More Options menu and click the Move to Live option (see the Using the Project Manager tutorial for more info).

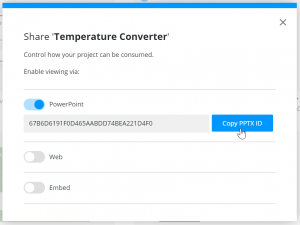
Open the More Options menu once again and click Share.
Make sure that the PowerPoint sharing option is active and then click the Copy PPTX ID button.

Inside PowerPoint
Open PowerPoint and create a new blank slide.
Click on the File menu and click Get Add-ins on the left-side menu.

In the Search field, type Squirrel and press Enter.
When the Squirrel365 Add-in appears, click the Add button.

Read the license terms and privacy policy and then click the Continue button.
The Add-in will be placed on the slide.
Paste the PPTX ID (that you copied in Step 4) into the field in the center and click Confirm.

The Squirrel project will appear in the PowerPoint slide.
You can reposition the project by selecting it and dragging it to a different position with your mouse.
You can resize the project by grabbing the selection handles and moving those. The project will resize but it will maintain its aspect ratio, so it won’t be stretched in either direction.
If you want to swap the project for a different one, select the cog in the bottom right corner and paste in an alternative PPTX ID.

Once you’ve used this Add-in, it should appear in the My Add-ins dropdown list in PowerPoint. You will need to add one for each Squirrel project that you want to include in your presentation.

That’s the end of this guide to adding a Squirrel project to a PowerPoint presentation. Take a look at the other tutorials and topics in the Learn section to learn more about using and sharing Squirrel.
Last updated
Was this helpful?