

Zapier Trigger
This article describes the Zapier Trigger connector and its properties.
Who can use this feature?
All Squirrel365 plans have access to the Zapier Trigger connector.
For more details, see our pricing comparison matrix.
Zapier is a no-code tool that integrates web applications. Within Zapier, you create “Zaps” that connect your applications. There are two main components of a Zap. A trigger and an Action.
The Trigger is what starts the Zap. This tells the Zap to run and provides data to the Zap. The Action is what Zapier does with the data inside the Zap. For example, sending the data to another web application or system.
The Squirrel Zapier trigger connection allows you to trigger a Zap from your Squirrel project.
For example, if you have a calculator in Squirrel where a prospective customer has entered some values to generate a quote. Squirrel could send this data to Zapier, where it automatically updates your CRM and sends you an email or a text message.
Defining the Trigger
DEFINITION
To start the definition of the connection, the data which will be sent to the Zap must be specified:

This will be a range with either two rows and several columns or 2 columns and several rows. For example, if the data to be sent was about two new orders and included the order number for each, the product ordered, the number of units, and the total sale value, then these could be sent in either of the following two ranges:
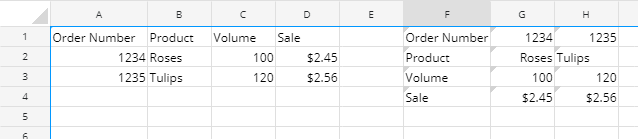
When the trigger fires, the data will be passed to Zapier, which will trigger the Zap once for each row/column of data.
Once the data has been specified, more properties appear:

Data is in … – this specifies whether the data specified is in rows or columns, choose the one that matches the data specified
Includes header row – it is strongly recommended to have a header row/column in your data (as shown in the data example above), as this will make specifying the details of your Zap in Zapier significantly easier. If there is no header row/column in the data, then this option should be unchecked, and Squirrel will add headers of Item1, Item2, etc.
Ignore blank rows – when this option is checked, Squirrel will remove blank data from the end of the range when sending the data to Zapier.
Give your trigger a name – this property is used to give your trigger a meaningful name, this name is passed to Zapier and can be used to manage your triggers via the Squirrel 365 cloud.
Once all these properties are specified, click the “Register Trigger” button to register the trigger with the Squirrel365 cloud.
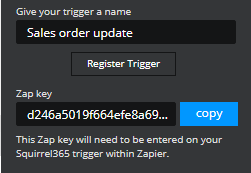
Once the trigger has been registered, a Zap key is displayed. This key will be used to uniquely identify the trigger with Zapier. The copy button will place the Zap Key in your clipboard; you will need it later when setting up your Zap in Zapier.
TRIGGER ZAP WHEN…

Project loads – If this option is checked, the Zap will be triggered as soon as the Squirrel project has been loaded.
Cell changes – If this option is checked, then a cell in the spreadsheet needs to be specified, and the Zap will trigger when the value in that cell changes.
Cell Equals – If this option is checked when the value in a cell equals a particular value
When cell – this property must be bound to a single cell in the spreadsheet
Equals – this gives the value against which the cell value is tested; it can either be bound to a single cell in the spreadsheet or specified directly in the property box.
Configuring the Trigger in Zapier
In Zapier, create a new Zap and select the Squirrel365 app and trigger event.
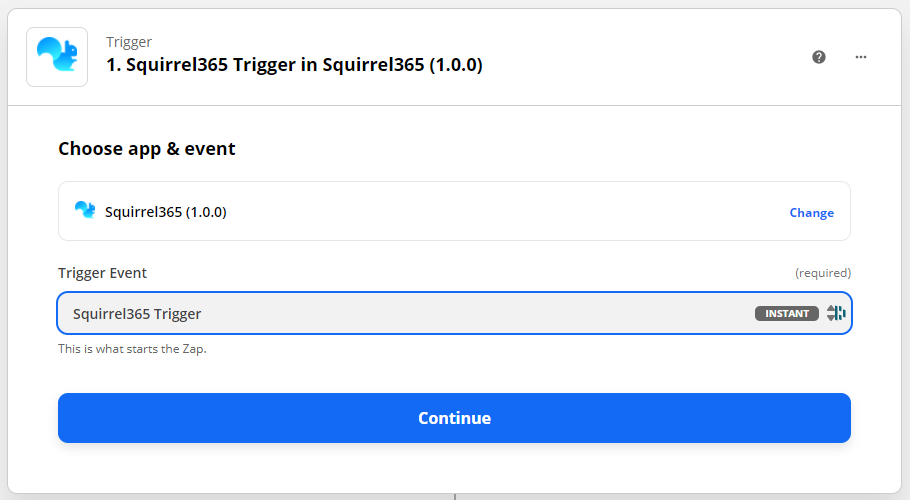
This is an “instant” trigger which means that as soon as Squirrel sends the data to Zapier, the Zap workflow is instantly executed.
Click Continue and in the next screen, paste in the Zap key copied from the trigger connection’s property sheet (above) and click Continue

The next step will be to test the trigger. When you press the “Test trigger” button, Zapier will communicate with the Squirrel365 cloud and get the sample data saved as part of the registration process above.

Once you’ve got the sample data, you will be able to continue configuring Zapier to connect to any of the many actions available across a wide variety of web apps.
Last updated
Was this helpful?