Whack-A-Squirrel Game
Last updated
Last updated
In this ‘How-To’ you can learn how to make your own Whack-A-Mole style game. You’ll make use of the timer and the data mover functions, use data binding, dynamic visibility and data insertion, add a random number generating formula, set up a scoring system and much more. Check out the finished game below then scroll down to the step-by-step instructions and have a go!
Section 1: Add the components to the canvas
Section 3: Add data and logic to the Spreadsheet
This tutorial will take approximately 45 minutes to complete.
Either follow the instructions in this section to add all of the required components to the canvas, OR download a starter file from here and jump straight to section 2.
Use the following as an approximate guide for the component positions. But don’t worry too much about the Squirrel position, we’ll be setting that later:
Add Squirrel image:
Add an image component to the canvas
In the GENERAL drawer of the property panel, Source image from property either point to the URL of a square squirrel image or import an image file. You can use our little blue buddy if you like?:
Right-click on the squirrel image below
Select copy image address
Set Source image from property to URL
Paste the image address into the Image URL property field
Check the Resize image to component property
In the property panel resize the width property to 64 and the height property also to 64
Rename to SquirrelImg by double-clicking on the current name of the image component in the object browser
Add a target button:
Add a pushbutton component to the canvas
Rename to SquirrelBtn
Format SquirrelImg and SquirrelBtn:
On the canvas, select SquirrelImg and press the shift button while also clicking the SquirrelBtn component, this will select both components
Use the Arrange menu, select Size and then Make same size. As SquirrelImg is the primary object (selected first) the SquirrelBtn will be resized to match SquirrelImg
Select just the SquirrelBtn in the Object Browser
In the BUTTON STYLING drawer of the properties panel, DEFAULT TEXT section delete the contents of the Button text property field
In the DEFAULT STYLE section, uncheck the Fill property
In the Effects dropdown, select None
Uncheck the HOVER STATE properties
Uncheck the PRESSED STATE properties
Add a start button:
Add another pushbutton component
Change the button name to startBtn
In the DEFAULT TEXT section change the Button Text property to WHACK-A-Sqrl!
In the DEFAULT STYLE section, change the Fill property to 0099FF
Add level text label:
Add a text label component
Rename to levelTxt
Select levelTxt
In the LABEL TEXT drawer of the properties panel, change the Text to display property to Level:
In the TEXT STYLING drawer, set to Left justified
Add a level selector:
Add a value input component
Change its name to levelSel
Add score text label:
Add a text label component
Rename to scoreTxt
Select scoreText
In the LABEL TEXT drawer of the properties panel, change the Text to display property to Score:
In the TEXT STYLING drawer, set to Left justified
Add a finish game text label:
Add a text label component
Change its name to finishTxt
Select finishTxt
Amend the X position to 0 and the Y position to 0
Amend the width to 232 and height to 232
In the LABEL TEXT section, change the Text to display property to Time’s Up!
In the TEXT STYLING section, style the text caption as follows:
Font: Arial Black
Size: 36
Text color: 606060
Paragraph alignment: centered horizontally and vertically
Add a rectangle to block mouse events:
Add a rectangle
Rename it to controlCover
Resize and reposition it to cover both the startBtn and levelSel
Uncheck the Border property
Check the Block Mouse Events property
Now all of the necessary components should be on the canvas. Your object browser and canvas should look similar to this:
Add a timer function:
In the Object Browser, open the FUNCTIONS drawer
Select Timer from the dropdown and click the + button
Double-click to rename to SquirrelTmr
Add a data mover function:
Also, in the Object Browser FUNCTIONS drawer
Select Data Mover from the dropdown and click the + button
Double-click to rename to SquirrelDataMov
Randomise the SquirrelImg position:
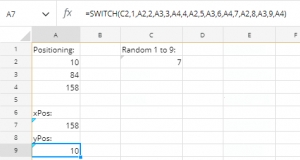
There are 9 possible positions for the squirrel to move to. Think of these as a grid, with 3 x and 3 y positions, in the following grid they are 10, 84 and 158. We can use this information to set the x and y positions of the squirrel image (and the squirrelBtn).
Add the following data to the spreadsheet, ensuring that your data occupies the same cells shown:
In cell C1, type in ‘Random 1 to 9:‘
Copy the following formula into cell C2:
=SUM(RANDBETWEEN(1,9))
This formula will place a random whole number between 1 and 9 into C2. The resulting number represents a random grid position (see grid diagram above).
Type ‘xPos:’ into cell A6 and ‘yPos:’ into cell A8
Copy the following switch statement into cell A7:
=SWITCH(C2,1,A2,2,A2,3,A2,4,A3,5,A3,6,A3,7,A4,8,A4,9,A4)
This is checking if C2 is equal to 1, take the content of A2 and place it into A7, if C2 is equal to 5, take the content of A3 and place it into A7, and so on for the remaining numbers. This will be the X Position. Refer back to the grid diagram above to see how the cell addresses match up to the grid positions.
Copy the following switch statement into cell A9:
=SWITCH(C2,1,A2,2,A3,3,A4,4,A2,5,A3,6,A4,7,A2,8,A3,9,A4)
This is checking if C2 is equal to 1, take the content of A2 and place it into A9, if C2 is equal to 3, take the content of A4 and place it into A9 and so on for the remaining numbers. This will be the Y Position. Notice how the switch statement is different to the one entered in A7. Refer back to the grid diagram above to see how the cell addresses match up to the grid positions.
Don’t worry if the values in cells C2, A7 and A9 in the above image are different to yours. This is likely because the random number generated from the formula in C2 is different to that shown above, and will therefore generate a different ‘grid position’.
Set the SquirrelImg and the SquirrelBtn position properties:
With the x and y positions generated, these can now be bound to the X and Y position properties of the SquirrelImg and SquirrelBtn.
Select SquirrelImg in the Object browser
Click the data binding icon above the X position property field
Select cell A7 and then the Confirm button
Click the data binding icon above the Y position property field
Select cell A9 and then the Confirm button
Repeat steps 1 to 5 for SquirrelBtn
Create a scoring mechanism:
To create the scoring mechanism, count the number of times the user successfully clicks the SquirrelBtn (positioned directly above the SquirrelImg).
In cell C3, type in ‘Score:’
Copy the following formula into cell D4:
=SUM(C4+1)
This will take whatever value is in C4 and add 1 to it.
Select SquirrelBtn and open the DATA INSERTION drawer in the properties panel
Click the data binding icon above the Source data property and select cell D4
Click the data binding icon above the Destination property and select cell C4
When the user successfully clicks the button, the value from D4 will be copied to C4, then the formula in D4 will take the new value of C4, add 1 to it and increment its own value by 1. This will happen each time the button is clicked.
Display the score:
Select cell C3 and change it to the following formula:
=CONCATENATE(“Score: “,C4)
This takes the word Score: and adds the current score, so it will look like this: Score: 5
Select scoreTxt
In the LABEL TEXT drawer, click on the data binding icon above the Text to display property
Select cell C3 and click the confirm button
Setting the game level:
The timer level is linked to the speed of the timer. The lower the level, the slower the timer, the higher the level, the faster the timer. The default level will be level 5, the minimum is 1 and the maximum is 10.
Type ‘Current level:’ into cell C5
In cell C6 add the number 5
Type ‘Level min:’ into cell C7
In cell C8 add the number 1
Type ‘Level max:’ into cell C9
In cell C10 add the number 10
Select the levelSel component
Open the DATA INSERTION drawer in the properties panel
Click the data binding icon above the Value property
Select cell C6 and click the Confirm button
Not only does the levelSel take its initial value from this cell, it will also write back a new value to this cell if the user interacts with the spinner buttons or types in a new numerical value.
Check the Enable limits property
Click the data binding icon above the Min property
Select cell C8 and click the confirm button
Click the data binding icon above the Max property
Select cell C10 and click the confirm button
Set the Timer properties:
Type ‘Timer Duration:’ into cell E1
Copy the following formula to cell E2:
=SUM(((C10-C6)*100)+100)
This formula will calculate a number from 100 to 1000 and this will be the millisecond duration for the timer. The higher the number, the faster the timer.
Select SquirrelTmr in the FUNCTIONS drawer of the Object browser
Click the data binding icon above the Delay in milliseconds property
Select cell E2 and click the confirm button
Change the Trigger when property to Cell equals radio button
Type ‘Timer trigger:’ into cell E3
Type ‘startTimer’ into cell F4
Type ‘stopTimer’ into cell F5
Reselect SquirrelTmr
Click the data binding icon above the Trigger cell property field
Select cell E4 and click the confirm button
Click the data binding icon above the Equals property
Select cell F4 and click the confirm button
Set the end game conditions:
A counter to count how many times the timer has executed.
Type ‘Timer counter:’ into cell E6
Select SquirrelTmr
Select Loop from the Insertion type property drop down
Click the data binding icon above the Loop counter property field
Select cell E7 and click the confirm button
Each time the timer executes, the value in E7 will increase by 1.
Type ‘Timer stop at:’ into cell E8
Type 20 into cell E9
Reselect SquirrelTmr
Click the data binding icon above the Stop after n loops property field
Select cell E9 and click the confirm button
Show Time’s Up notification when the game is finished:
Type ‘Time’s up:’ into cell E10
Copy the following formula into cell E11:
=IF(E7=E9,”TRUE”,”FALSE”)
This formula is asking if the timer counter is equal to the value of Timer stop at. If it is, then make the value of this cell TRUE, otherwise the value of this cell is FALSE.
The spreadsheet should now look like this:
Select finishTxt
Open the DYNAMIC VISIBILITY drawer in the properties panel
Click the data binding icon above the Status property field
Select cell E11 and click the confirm button
Type TRUE into the Value property field
Make controls unavailable during game:
The data mover function will be used to change a set a timer status. This will determine when the controlCover rectangle is visible. When visible it will block mouse events to both the startBtn and the levelSel.
Select SquirrelDataMov in the FUNCTIONS drawer of the Object browser
In the Series property field, select Series 1
In the Name property field type in timerStopped
In the Type property select Block from the dropdown
Bind the Source property to cell F5
Bind the Destination property to E4
In the Move data block when… section, bind Status property to E7
Bind Value property to E9
Open the DYNAMIC VISIBILITY drawer in the properties panel
Click the data binding icon above the Status property field
Select cell E4 and click the confirm button
Click the data binding icon above the Value property field
Select cell F4 and click the confirm button
Add the start game functionality:
Select startBtn
Open the DATA INSERTION drawer in the properties panel
Click the data binding icon above the Source data property field
Select cell F4 and click confirm
Click the data binding icon above the Destination property field
Select cell E4 and click confirm
Although the timer is working, the random number generator is not being triggered each time the timer executes. For this to happen, change the formula in C2 to the following:
=SUM((E7-E7)+RANDBETWEEN(1,9))
Now because the counter in E7 is changing each time the timer executes, this addition triggers the formula to generate a new random number each time the counter number changes. An effective little trick!
Reset the score when game is restarted:
Select SquirrelDataMov
Click the + button above the Series property in the properties panel
Change the Name property to resetScore
Change the Type property to Block
Type ‘Reset score:’ into cell G3
Copy the following formula into cell G4:
=IF(E7=1,0,FALSE)
This formula looks to see if the timer counter has been reset. If it has, the value of the cell will become 0, otherwise the value of the cell is FALSE.
Make sure the SquirrelDataMov resetScore Refresh on data change property is checked
Bind the Source property to cell G4
Bind the Destination property to cell C4
In the Move data block when… section, bind Status property to G4
Add 0 to the Value property
Change to Debug or Preview mode to check that it all works. Then when you are happy with it, publish it for use outside of Squirrel!
In this build we’ve used Squirrel’s three core concepts of data binding, data insertion and dynamic visibility. If you’d like more information on these or any of the components or functions that you’ve used, check out the other content in the Learn section of the website and also take a look at the tutorial videos on the Squirrel YouTube channel.